Why? How? Joining Young Living Essential Oils

Young living 5

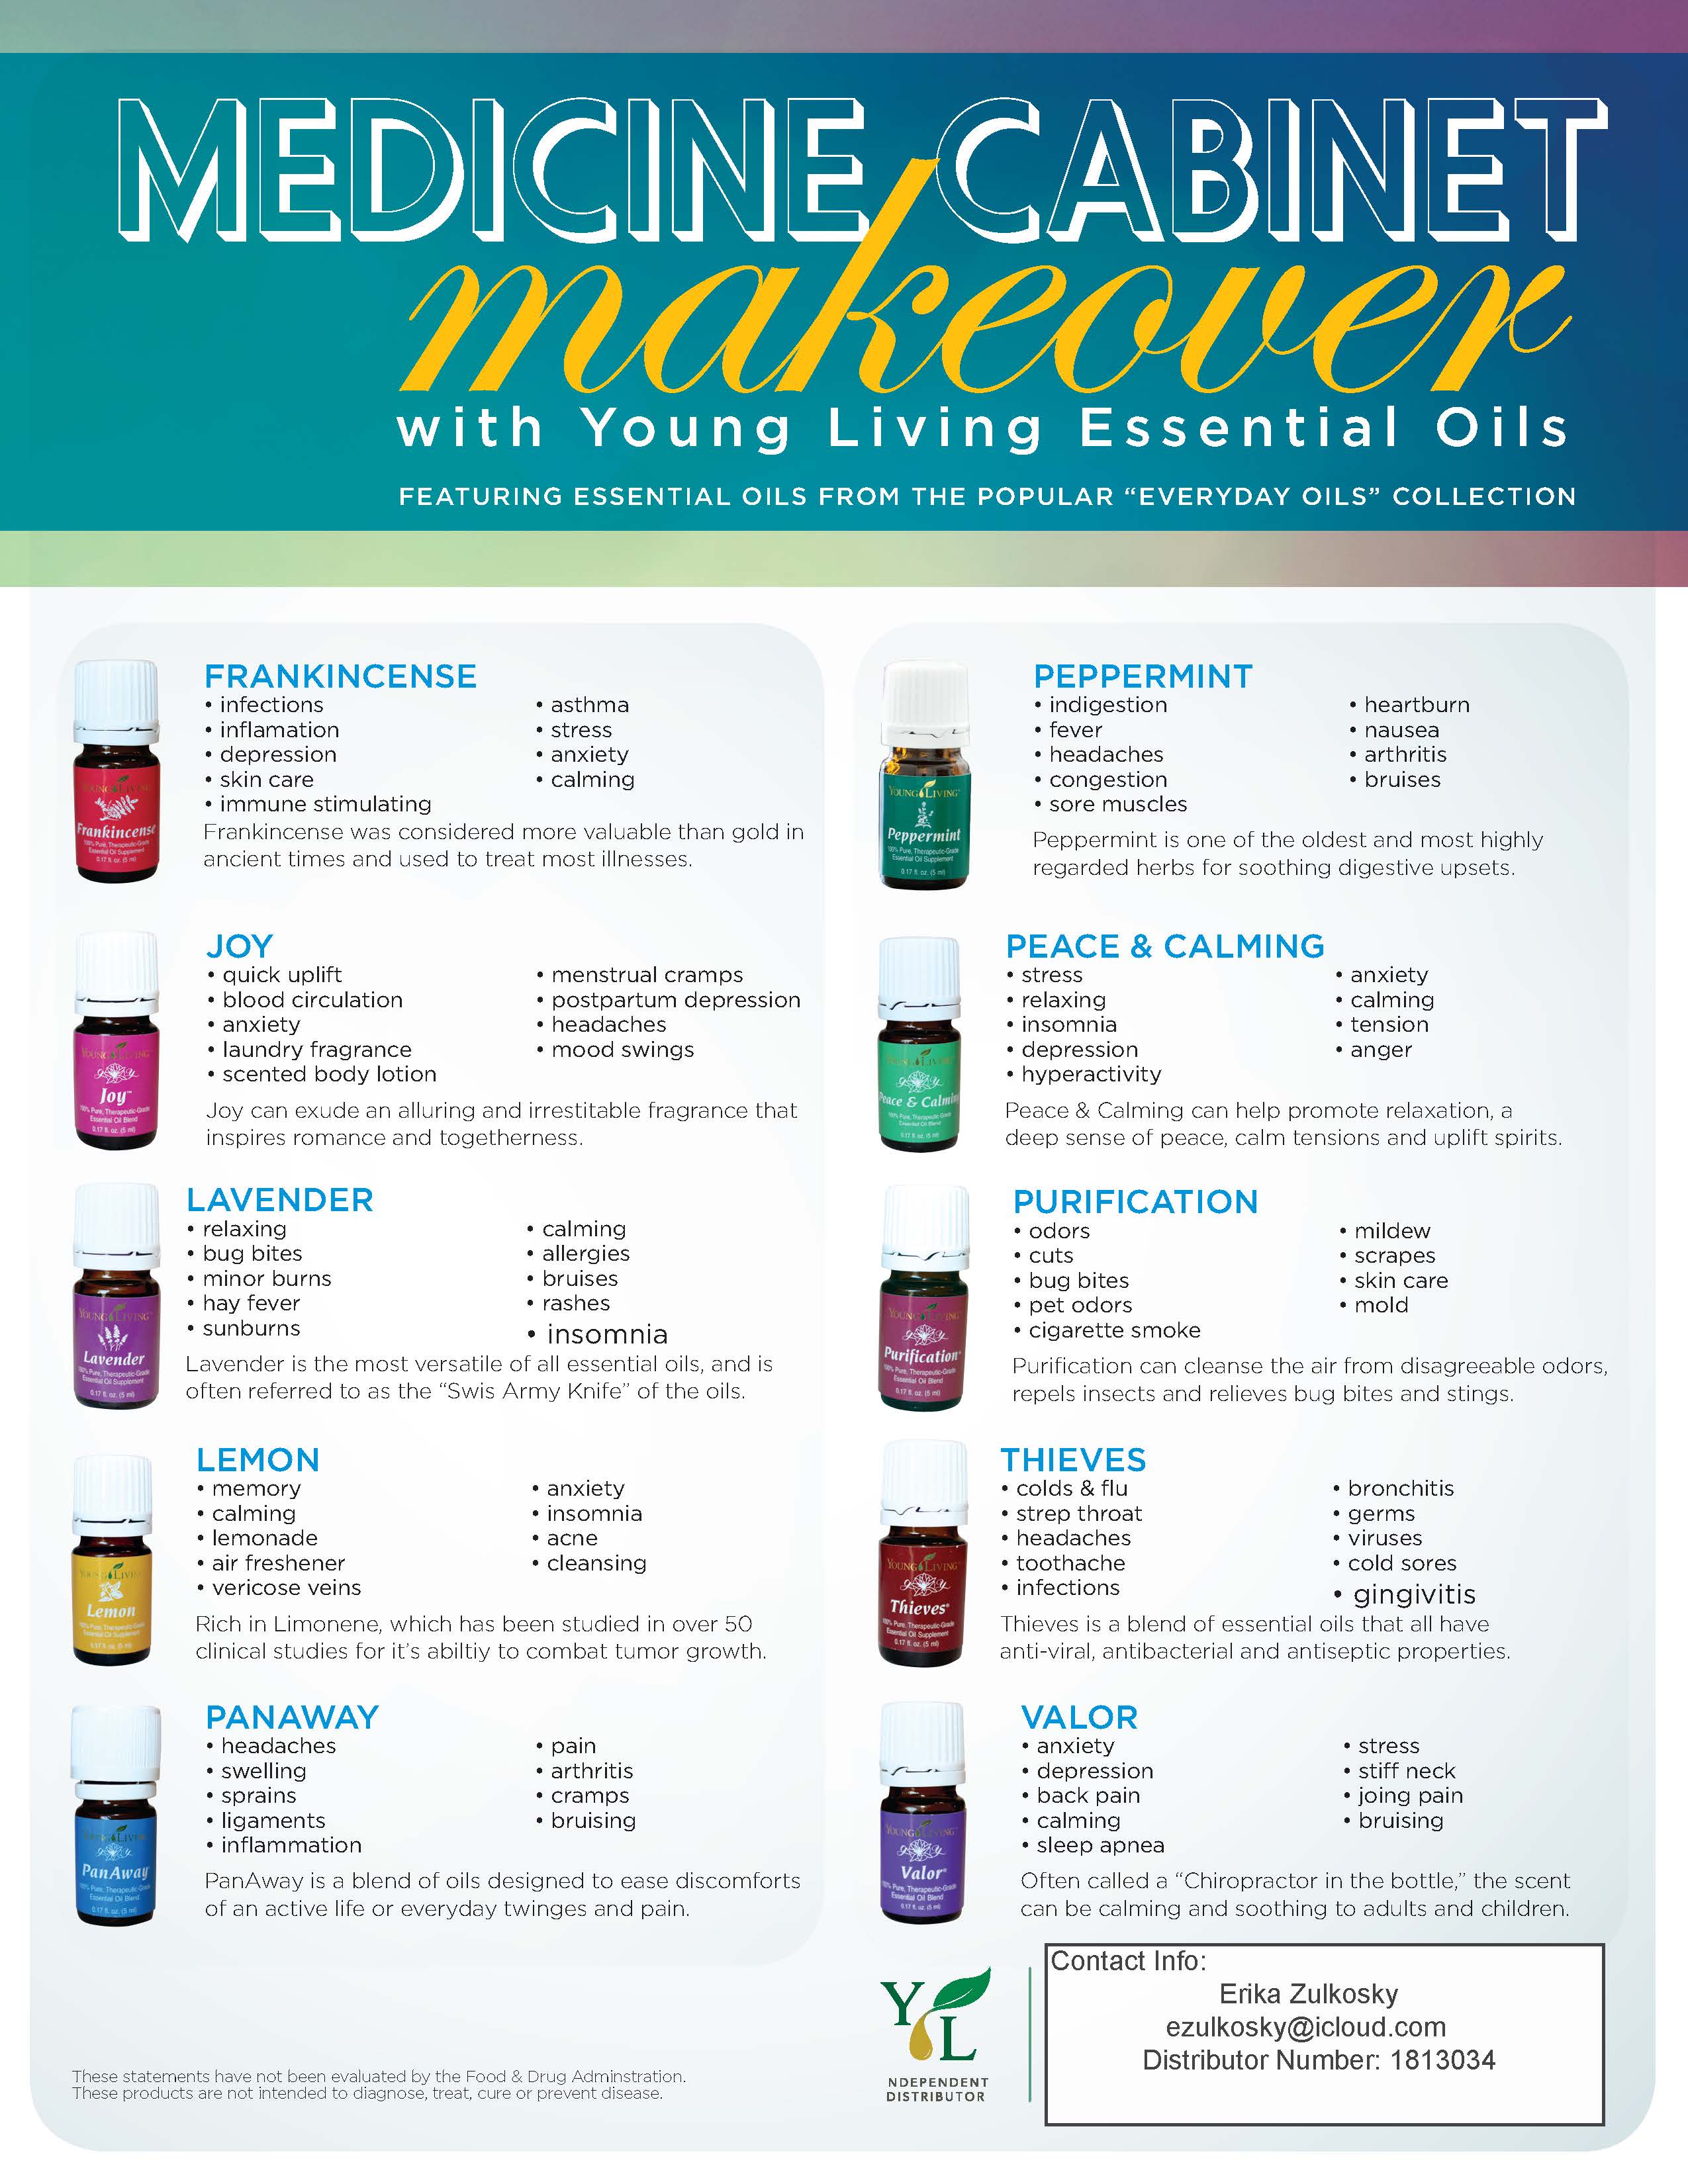
My family and I started using Young Living Essential Oils earlier this year. Aaron can be a bit of a snorer, and I was tired, frustrated, and about to send him to a doctor of some sort. Right before I got to that point, a friend recommended that we try an essential oil on his big toes each night. We figured anything was worth a shot, so we gave it a try—buying a bottle of Young Living Valor Oil—and we haven’t looked back since!

 We’ve been able to treat migraines, sleeplessness, allergies, illnesses, and we’re even working on hair loss (sorry honey!). Really, my list could go on and on, but my point is that knowing that we are able to take care of ourselves without medical intervention has been so empowering! Making healthy choices has become very important to us, and we love to share our experiences with others. I get a little giddy each time I hear a complaint from someone—my motto has become “There’s an oil for that!” and seeing the pleasant surprise and amazement at each success has become my reward.

As I become more and more educated on the many uses for the oils, we have been able to make changes to our medicine cabinet. Prior to Young Living, I was taking a preventative medicine for migraines daily as well as migraine response medication 3-4 times a week—I’ve been off of both for months now, using Young Living Peppermint Oil if I get a twinge in my head. Within minutes my head is clear and I feel invigorated!

Medicine Cabinet Makeover

I love all of the testimonies that we have as a family and from our friends, but you may ask what about Young Living makes them superior? Young Living owns their own farms and distilleries worldwide so that plants can be raised in their native environments, and if a farm is a co-op that Young Living uses, that farm must meet the same quality standards as Young Living farms. Only plants that are free of chemicals are used, and Young Living oils are steam-distilled in stainless steel chambers at low pressure and low temperature, while citrus oils are cold pressed from the rind. Young Living also does all of their own bottling, ensuring that the contents of the bottles are pure essential oils—no added chemicals or dilution. Talk about quality!

Given the successes that we’ve experienced within our family and friends, as well as the research I did around the superior quality of Young Living Essential Oils, I signed up pretty quickly.   I respect the company, their pure oils, and the opportunity to expand and grow within their organization—even by just sharing our successes!

If you are even slightly curious and interested, here are some of the most common questions I have received:

Why should I become a whole sale member?

Signing up as a wholesale member is a great opportunity that gives you 24% off of retail price! As a wholesaler, you also have the option to share the oils with others in order to earn monthly commissions and promotions for free oils. As a wholesaler, you are not required to have a Young Living business—but it’s a great opportunity if you’re interested!

Is there a monthly order minimum?

No—you can simply order when you need it. To maintain your wholesale status, you only have to place one 50PV minimum order per year—that’s roughly $50 per year in product, and trust me—you’ll be ordering!

What kit do you recommend?

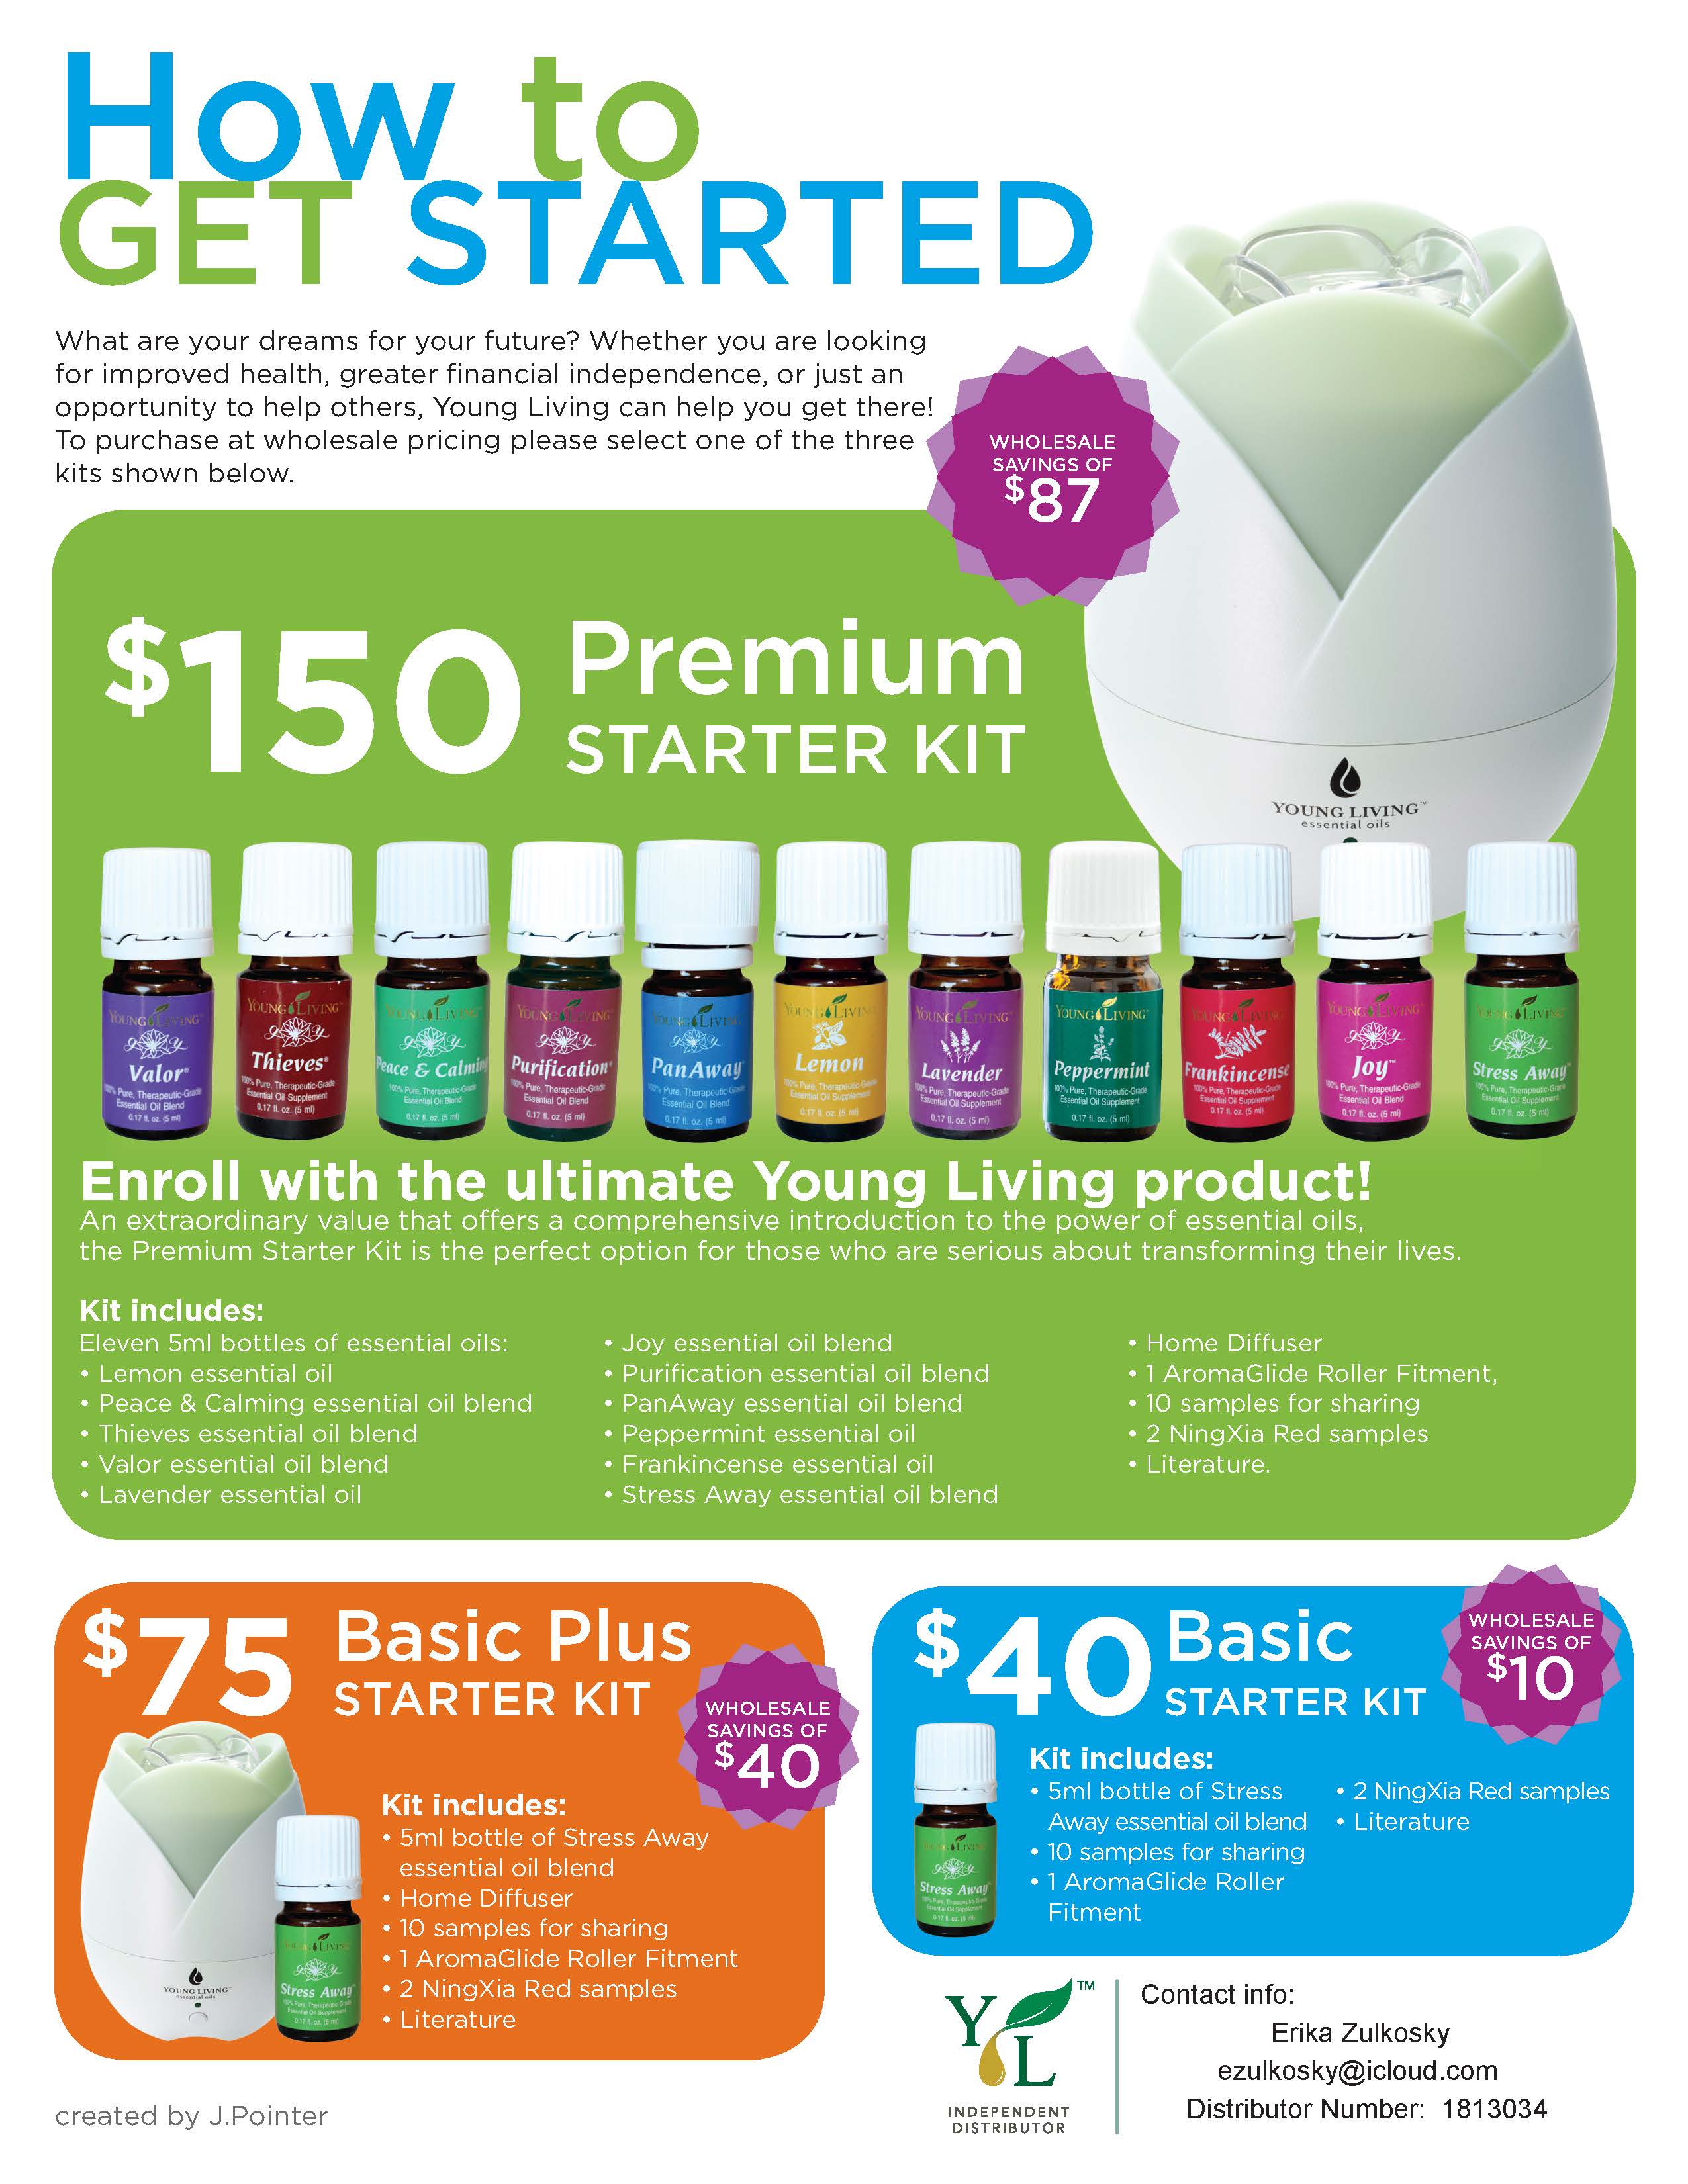
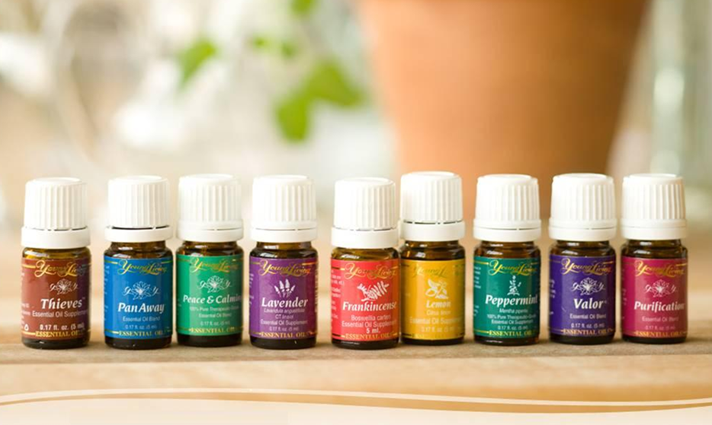
I recommend the premium starter kit with the diffuser. It may seem like a lot of money on the front end, but if you do the cost comparison, you’re truly saving money! The diffuser alone retails for over $90, and the box of 10 oils alone retails for over $160. With the premium starter kit, you receive the diffuser, the box of 10 oils, an additional oil, and other sample products. What a savings!

starter kit handout 2-blank

Do I get anything for signing up?

When you sign up, you are given your own member number, and I will send you your own special link to share with others who may be interested in Young Living. Additionally, when you sign up as a wholesale member under me, I send you an Essential Oil Pocket Reference book. FYI though—there is NO WAY this book can fit in your pocket! It has that much information! J

Is there anything else I should know about?

Yes, Essential Rewards is a program that offers reduced shipping, credit for free oils, and there is a new promotion each month to earn free products when you place an Essential Rewards order. But don’t worry—this is an added feature that you can participate in if you’d like.

Young living

Steps to join Young Living:

  1. Click here to start the enrollment process. As a default, Wholesale Member will already be selected. If you switch to a Retail Customer, you will not receive the 24% discount.
  2. Make sure my member number (1813034) has been filled into both the sponsor and the enroller ID spots.
  3. Complete your contact information, to include an email address so that I can contact you. In the contact information, you are asked to supply your SSN. This is only for tax purposes, so that if you make over $600 per year selling products, Young Living will send you a 1099 form. I will not see your SSN, and Young Living does not share it with anyone.
  4. Choose the kit that you want—again I highly recommend the Premium Starter Kit with Diffuser.
  5. You can skip the Essential Rewards portion unless you would like to sign up for that right away. If you don’t want an Essential Rewards kit, simply check the “No thank you” button at the bottom.
  6. Proceed through checking out, ensuring that you complete your order.

So, are you ready to take the plunge into the wonderful world of oils, ditching the drugstore remedies? If you have any questions, please feel free to send me a message—I’d love to help you out!

Click here to order your premium starter kit 


Two Thumbs Up Heart Healthy Chocolate Chip Cookies

cookies and milk

Running. I enjoy running. I enjoy building up stamina, beating goals, and the feeling of accomplishment when you’re done. Don’t let me fool you though—I am by no means a good runner! In fact it’s been almost two years since I’ve really gone for a true run (and the size of my pants is a testament to that). This weekend, I got it in my head that I would pick up running again, and to make it even better, I decided it would be a family affair.

So, Saturday morning, I donned my running gear, laced up my shoes, put the leash on the dog, and…told the kids to grab their bikes or scooters. This would be fun right? I would get to run, the dog would get out for exercise, and the kids would get to ride. Well, if you know where we live, you’d know that no matter what direction you go from our house, you’re basically going uphill. So—peptalk time!

“Guys you know we’ve gotta go uphill for a bit, but we’re tough, right?!?!”

“RIGHT!!!!”

“Great! So, there’s no fussing on the way up cause remember then we get the sweet, sweet downhill!”

“YEAH!!! We loooove the downhill! Can we go fast?”

“You bet!”

So, out we go…around the corner…and uphill. Ten minutes in, I was carrying a scooter while Jax was trailing behind, “MOOOOMMMM!!! WAIT FOR ME!!!!” Two minutes later Jax was balanced on his scooter as I tried pulling it while running. One minute later, huffing and puffing, I caved. “Guys, can we do this? Can we keep going? Or should we turn around and go downhill?”

“Let’s go DOWNHILL!!!”

So much for my first run in two years…it can only go uphill from here, right (hee, hee, hee)!

Even though my first run-run was a flop, my first run on these cookies wasn’t! J Luckily I had all (well, almost all) of the ingredients on hand—I love it when that happens! I didn’t have actual oat flour, but if you grind your oats in a food processor for several minutes, you can easily—and for a fraction of the cost—make your own oat flour. I also love that you can talk yourself into saying that these cookies are “healthy”, they are scrumptious, and Connor gave me two thumbs up…lots of two thumbs up!!

Because my batter was still a bit warm when I mixed in the chocolate, some of it melted into the batter making a chocolate chocolate chip cookie—mmm..mmm! If you want a less chocolately batter, let your mix completely cool, but good luck waiting that long! The cookies bake up nicely, but be sure to let them cool on your pan before transferring or else they’ll flop apart…not that I would know or anything… 😉 Once the cookies are cooled, they are chewy and break apart easily. The kids loved that!

upclose cookies

Heart Healthy Chocolate Chip Cookies

2 cups walnuts
3 TBSP canola oil
1 cup brown sugar
2 tsp vanilla
1 ½ cup oat flour
1 tsp baking soda
1 tsp salt
¼ tsp cinnamon
2 cups rolled oats
10 oz. bittersweet chocolate, chopped

Directions:

  1. Preheat your oven to 350.
  2. In a food processor, blend the walnuts until they are ground into a fine meal. Add the oil, and blend for 2-3 minutes, until the consistency of natural peanut butter. Transfer to a bowl.
  3. Whisk together the brown sugar and ½ cup of water in a pan and bring to a boil.
  4. Pour the brown sugar mixture over the walnut butter. Add the vanilla, and stir until there are no lumps.
  5. Whisk together the oat flour, baking soda, salt, and cinnamon.
  6. Stir the oat flour mix into the walnut mix. Cool the dough for at least 10 minutes.
  7. Fold the oats and then the chocolate chips into the dough.
  8. Shape the dough into 2-inch balls and placed onto parchment lined baking sheets. Flatten the cookies with the bottom of a glass sprayed with cooking spray.
  9. Bake for 10-12 minutes or until the cookies begin to brown.
  10. Cool for several minutes and transfer to wire racks.


Enjoy the cookies, and in the meantime, I hope that with more practice, the uphills won’t be so daunting…for the kids…or for me!  So, what pointers do you have for getting back into the swing of things?

Scrumptious Cinnamon Carrot Muffins

Carrot muffins 2

I must be on a cinnamon kick…wait…who am I kidding?!?! When am I not on a cinnamon kick? I could really put cinnamon in just about anything…muffins…cookies…cakes…scones…pies…tarts…you name it—let’s put cinnamon in it! I’m also a big fan of using up ingredients in the house. For some reason, we’ve had an abundance of carrots in the house. Weird, right? The kids must have been going through a carrot phase or something, and now they’ve moved on to another vegetable. (One of the benefits of having a vege mom! 😉 )

So…what does one do with an abundance of carrots? Why, bake of course! We—and by “we” I mean Aaron—pack the kids lunch for school every day. They get tired of sandwiches, so I do my part by trying to help with some variety. One of my contributions that I like to make is different kinds of muffins. Muffins are great because the kids love them, they can act as both a breakfast item and a lunch item, and you can make a bunch at once, covering a few meals. They can be frozen and thawed quickly, and they can pack quite a punch!

These muffins are a great combo of moist, sweet, healthy, and…scrumptiousness! The kids loved them! They were actually gone before I could even think of freezing them, and I’m pretty sure we only made it through one lunch serving.

I love that these muffins have whole wheat flour, wheat germ, and of course carrots…on some level they must be healthy…right? When grating the carrots, make sure to use the small side of the grater—the finer the carrots, the better!

Cinnamon Carrot Muffins

*Adapted from Martha Stewart Living

  • 3/4 cup all-purpose flour
  • 1/2 cup whole-wheat flour
  • 2 tablespoons wheat germ
  • 1 1/2 teaspoon ground cinnamon
  • 1 ½ teaspoon baking powder
  • 1/2 teaspoon baking soda
  • 1/8 teaspoon kosher salt
  • 1/3 cup vegetable oil
  • 1/3 cup almond milk
  • ½ TBSP vinegar
  • 1/2 cup applesauce
  • 3/4 cup light brown sugar
  • 2 cups finely grated carrots (4-5 carrots)

Directions:

1.  Preheat oven to 350 degrees. Line a muffin tin with paper cups.
2.  Whisk flours, wheat germ, cinnamon, baking powder, baking soda, and salt in a bowl. Combine the almond milk and the vinegar and put aside. Whisk remaining ingredients in a separate bowl; add in the almond milk mixture. Fold dry ingredients into wet and mix until just combined.
3.  Spoon batter into cups, filling 2/3 of the way full.
4.  Bake until a toothpick inserted in the center of a muffin comes out clean, about 22 minutes. Cool in pan for 15 minutes, then transfer to a wire rack to cool slightly before serving.

So, go ahead and bake up some of these deliciously scrumptious…umm…healthy (?) muffins!  And go ahead…add an extra pinch of cinnamon.  I wouldn’t blame you 😉

What do you like to use cinnamon in?